I have placed some new art from Abiboge, the character artist of Hypatia, the main character. A smaller update since last week was my birthday week, so I didn’t get as much done as I wanted RIP. But what can you do? So some updates on Hyperborea:
The game will be free-to-play. In order to support the game, an art e-book or printed book will be available for purchase on Steam or Amazon.
I’m in the process of developing a random objective location system for Hyperborea so each time you play the game, key items will spawn in different places.
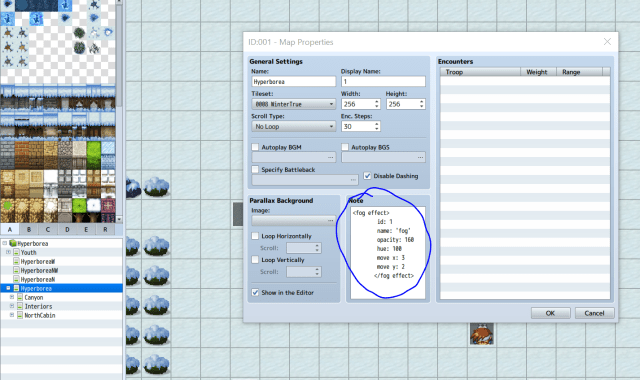
I hope that you are doing well. Today I will go through several ways that I found worked for making fog effects work in RPGMAKER MV. I will use one plugin each and show how they work:
Using Victor’s system was fun, easy and understandable. After installing the plugin and enabling it in RPGMaker MV, you input code into your map notes section. I found that Victor’s example was more than sufficient as a speed and setting.
Now comes the fun part. Tinkering to make sure that your fog actually looks okay.
Finding the Right Fog:
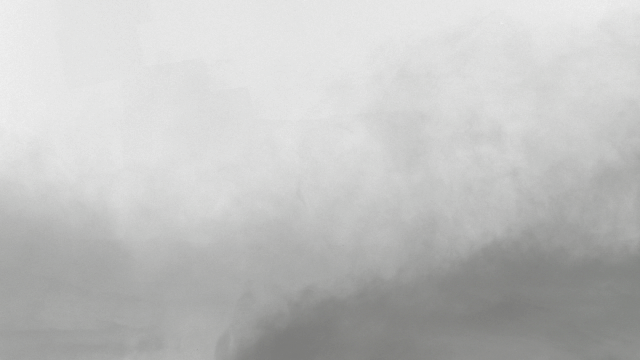
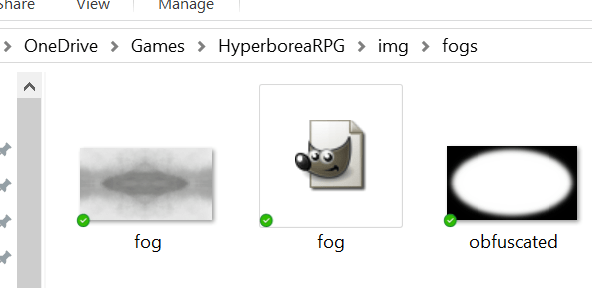
Finding a fog asset or creating one remains one of the most important issues. I used one under the CCL for this example that I found here. Pictured below is the fog that I was quite excited to use.
After placing the file in img/fogs. I turned on the game to find both excitement and disappointment. First, hurrah, it worked. Of course, nothing works smoothly on the first run, does it? As you might guess, I did not take into account the pathway of the panning of the fog. After the panning got to the end of the picture and looped, the discrepancy of color between the edges was highlighted.
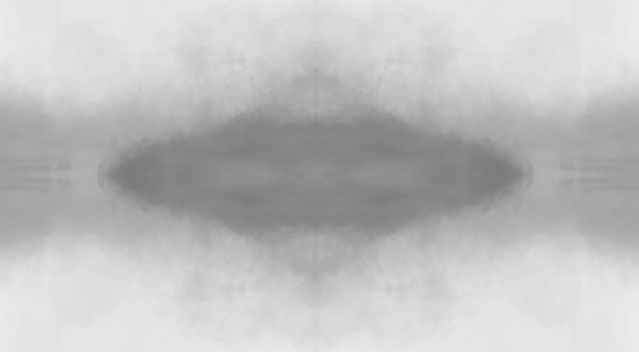
A solution to this issue is to make the image symmetrical and identical on the entry and exit points of the picture. Below is an example of what I used in order to ameliorate my woes, basically the original fog image concatenated with the image flipped once horizontally, once vertically, and once both.
Last week I got swamped with my day job, which really limited my ability to work on Hyperborea and Self Insert Draft. But I did get a fog system and a particle system to work using different plugins for RPGMAKERMV. I will produce a writeup for you all tomorrow. In the meantime, please enjoy some backgrounds from a very talented artist Fadjar01 who has been helping me with Hyperborea.
Hello! I hope that you are all doing excellently. This week I have been working on the level design of Hyperborea as well as implementing a simple bullet system in Hyperborea. Part of the fantasy behind Hyperborea is survival and struggle. With that comes some sort of resource management. This led me to have a project with a couple of desires:
Ammunition based combat (Hypatia isn’t going to find too many bullets in the wastes)
Restriction on firing rates (Hypatia uses a breeched loaded rifle)
After some tweaking, I was able to incorporate μ’ki (Riko Sakurauchi)’s system into my game. I will show you the steps of how to do the same in your game!
I used GIMP to create a small bullet what was transparent. Using a spray tool, I initially built the bullet at 32×32 pixels. overlaying gray with black. This proved too big, however, so I scaled it down to 8×8 pixels. After finishing the bullet, save it as a .png and place it in the img\pictures folder in your game.
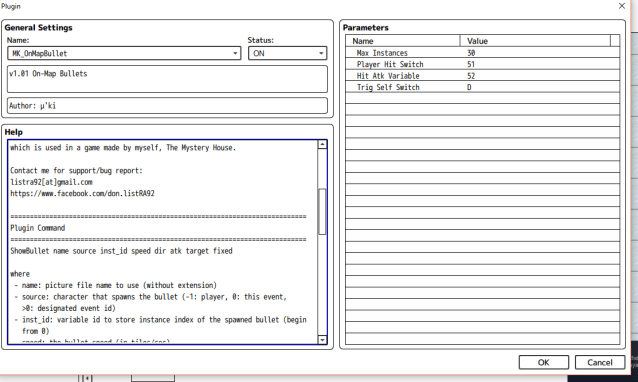
Initialising the Plugin
The settings of the plugin interface that I used. The default is fine.
I left the initial settings the same as default after enabling the plugin. The plugin description is perhaps the most important nibble of information that we can glean from here. The ShowBullet plugin command offers a wide array of choices. However, you do not actually need to use all of them. I omitted target and fixed. Hoping for the player to aim themselves.
ShowBullet name source inst_id speed dir atk target fixed

where

- name: picture file name to use (without extension)

- source: character that spawns the bullet (-1: player, 0: this event,

>0: designated event id)

- inst_id: variable id to store instance index of the spawned bullet (begin

from 0)

- speed: the bullet speed (in tiles/sec)

- dir: 1~8: down, left, right, up, SW, SE, NW, NE, 9: towards target,

10: homing

- attack: the bullet's Atk value

- target: character to aim towards (for dir = 9 or 10)

- fixed: whether not to rotate the bullet (can still be changed by

MoveBullet command)
Shooting the Bullet Event
Open a common event in the database (f9) and press plugin command.
My standard shoot became “Plugin Command:ShowBullet bullet -1 100 30 1 20”
-1 = Bullet spawns from character
100 = a random variable number that I have saved to use.
30 = speed in tiles per second
1 = Down Direction
20 = Attack which I did not really implement.
Now we run into our first issue. We want the payer to shoot in the direction that she is facing. This is easily fixed by using a conditional branch and using the character direction as the condition.
Corroborate the if statements with the directional numbers in the plugin description”- dir: 1~8: down (1), left (2), right (3), up (4)…”
  ◆If:Player is facing Down
    ◆Plugin Command:ShowBullet bullet -1 100 30 1 20
    ◆
  :End
  ◆If:Player is facing Left
    ◆Plugin Command:ShowBullet bullet -1 100 30 2 20
    ◆
  :End
  ◆If:Player is facing Right
    ◆Plugin Command:ShowBullet bullet -1 100 30 3 20
    ◆
  :End
  ◆If:Player is facing Up
    ◆Plugin Command:ShowBullet bullet -1 100 30 4 20
    ◆
  :End
Adding Flairs: Ammunition and Reloading Animation
Using the database, I added an item called cartridge. These represent the amount of ammunition that Hypatia has. Installing the ammunition is simple. Go into your common event where you set up your bullet shooting system and add an if statement to the line:
◆If:Party has Cartridge
◆Change Items:Cartridge – 1
Another requirement of mine was to add a different sprite when firing. This was simple. I added a change actor images line (and an angry bubble for flair) BEFORE a forced wait. This gives the illusion of her aiming.
In the end, a simple draft of the code looks like this.
◆If:Party has Cartridge
  ◆Change Items:Cartridge - 1
  ◆Change Actor Images:Hypatia, hypatia(4), $heroine-girl student 6 onepiece(0), sv_heroine-girl student 1 sweat suit
  ◆Show Balloon Icon:Player, Anger
  ◆Wait:85 frames
  ◆If:Player is facing Down
    ◆Plugin Command:ShowBullet bullet -1 100 30 1 20
    ◆
  :End
  ◆If:Player is facing Left
    ◆Plugin Command:ShowBullet bullet -1 100 30 2 20
    ◆
  :End
  ◆If:Player is facing Right
    ◆Plugin Command:ShowBullet bullet -1 100 30 3 20
    ◆
  :End
  ◆If:Player is facing Up
    ◆Plugin Command:ShowBullet bullet -1 100 30 4 20
    ◆
  :End
  ◆Change Actor Images:Hypatia, hypatia(4), $heroine-girl student 1 uniform(0), sv_heroine-girl student 1 sweat suit
  ◆
:Else
  ◆Text:hypatia(1), Window, Bottom
  :Text:no ammo
  ◆
:End
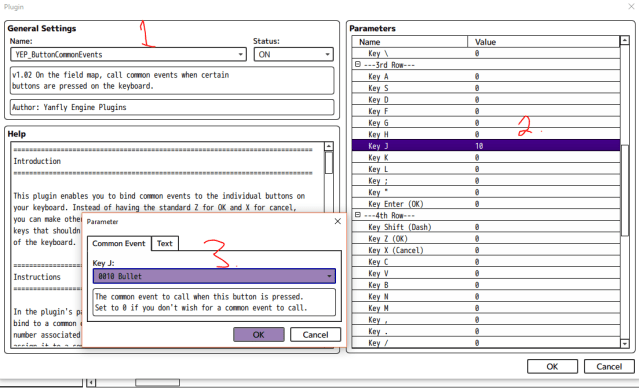
Mapping the Button
This is where Yanfly Button Common Events Plugin comes in handy. Be careful not to mix it up with Keyboard config, because they are not compatible! I learned the hard way.
The process of button events using Yanfly.
Setting up the button is easy. Just link it to your common events. For some random reason I chose the “J” key, but I will probably change it later.
Responsive Events
What fun is a bullet system if nothing reacts to a shot? Luckily in the plugin settings of μ’ki☆Maker‘s [RMMV Plugin] On-Map Bullets, it conveniently allows you to toggle a self-switch on an event. On a walking NPC, add another page where the Self-Switch is D (or whatever you set it to) and set the image to a character’s injured form!
Thank you all so much for reading. I hope that you learned something! More updates to come next week and some more Self Insert Draft things on Wednesday!
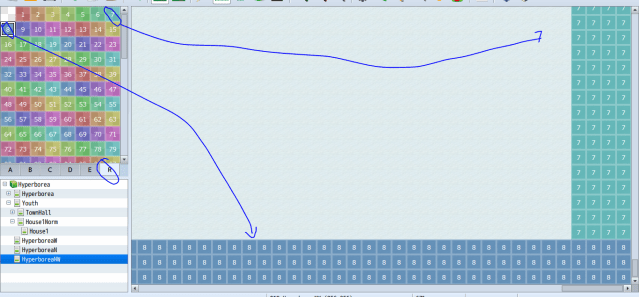
Greetings I have begun work on Hyperborea: The Frozen North in earnest now. I wanted to explain a little tutorial to aspiring developers regarding how to make “seamless” transitions between maps in RPGMakerMV. This technique works best if you have maps with large borders. Hyperborea, for the most part, is a barren and open environment. This, of course, lends itself to a maps with borders around 100 tiles. Doing this manually is a drag and if you make one mistake, R.I.P. Below are the steps that I took to ameliorate this issue.
Using the Map Paint tool, go to the “R” tab and select a region that you have not used. You only need to draw a region line one tile thick, however since I was counting tiles, I used the rectangle tool to draw large rectangles instead.
2) Setting the Common Event
The next step is setting up the Common Event. In this system, you will need a Common Event for every region that you traverse. Below are two examples of code. The first one is one that takes the player south. The second one, in text, takes the player west.
◆Control Variables:#0005 YHyperborea = Map Y of Player
◆Control Variables:#0004 XHyperborea = 243
◆Control Variables:#0006 MapID = 16
◆Transfer Player:{MapID} ({XHyperborea},{YHyperborea}) (Fade: None)
Explanation of the Variables:
YHyperborea: Determines where the player will spawn on the Y axis. This iteration is based on their position. Since the player is traveling from the East to the West in the text commands above, YHyperborea is variable.
XHyperborea: Determines where the player will spawn on the Y axis. This iteration is static.
MapID, this is an indicator of which map they are traveling to. It is a number obtainable from the bottom of the screen when working on a map.
To obtain some of the variables like Map X or Map Y of player, you can click on Game Data and select the character option.
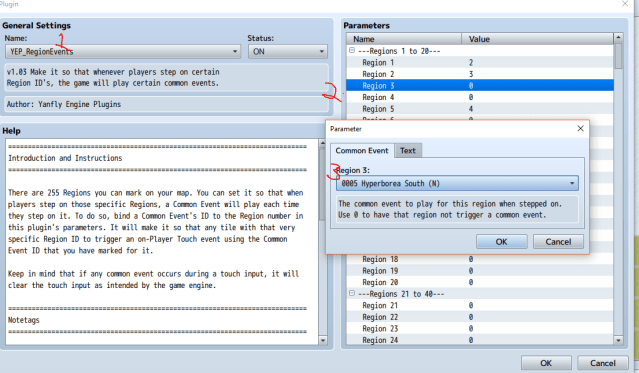
3) Adding the Event to Yanfly Region Events
Perhaps the simplest thing in this is tieing the region to the event. Open the plugin manager, select YEP_RegionEvents, select the region that you have painted, and choose the custom event! Voila! You should be set to go. Making region transitions “seamless” however, is another step that requires a bit of tinkering. It largely depends on how you have set your screen resolution. You will have to set the region markers a certain distance away from the borders of the map so that the player has the illusion that they are always in the center.
Apologies for the delay! Hope that you all had an exciting and fun-filled weekend. We’ve been super busy at Arcani and in my personal life. We just adopted a new kitten called Nike, after the Goddess of Victory, not the shoe! With regard to Self-Insert Draft, I am working on instituting conditional options based on your relationship with characters. Kind of like how in the Fallout Series you would have skill checks in dialogue (and other things), Self-Insert Draft will have relationship checks in dialogue. To this extent, relationship not only measures your bond between the character and yourself, it also measures your investment into the character. While not game-blocking, using your party members to convince the folk of the world will become a critical component in advancing the story peacefully. Of course, if you want most of your dialogue to go violently… well, go ahead, you can do that too.
The progress with Self-Insert Draft has been proceeding well! I have finished the third and fourth “quests” in the system. We are starting to move from the starter town to greener pastures. At a certain point, related to the quest the player is forced to choose between two different characters: The Redeemed Bandit and the Chosen One. The Chosen One is a character that I particularly fell in love with. You entered this world. A world that she was meant to save. However, you have been getting the glory. To some extent, she can serve as the true foil to the story, especially compared to the eponymous Emo Foil.
Additionally, I apologise for the new format. I thought it might be more palatable and a bit less formulaic to use a more casual and less structured style. Let me know what you think!
Greetings folk! I just got back from my vacation. While I did not get as much as I wanted done the last couple weeks since I was traveling abroad, I got a good about of story code done. Next week I will have a couple of exciting announcements. One related to the Self-Insert Draft, and another surprise.
Greetings folk! Last week I talked about elements of the battle system that I was working on. I have fleshed out most of the skills that I said I would earlier. Within this regard, its been quite a quiet week, not too much to report on sadly. Just new battle moves. One system in this regard is a new “dig system.” Moves kind of similar to the “Dig” or “Fly” moves from Pokemon.
Progress Last Week in Numbers:
Lines of Written Code: 43 (but a lot has been modified from the battle system discussed last week.)
Greetings folk! Last week I talked about some aspects of the story, but more importantly, the battle system! This week was primarily focused on the battle system. At this point, I have to really realign/determine my game design. Is this game going to be primarily a visual novel or a JRPG? If I am promoting a mixed format, how can I integrate them well enough in order to have a seamless experience? I don’t want to burden the people primarily interested in VNs with unnecessary battles.
Progress Last Week:
As stated in my previous I am using DemonAngelz’s Framework. I built the skills for the characters so far and am trying to iron out bugs as well as improve the GUI. I was proud that I became familiar with the tooltip function so people will understand the mechanics of “Ha! Nothing Personal!” rather than sighing at a dead meme.
DemonAngelz framework is great, however, perhaps purposefully, bland. I’ve tried to spice up the system with multiple varieties of attacks that players will have to choose from. There are simple attacks like “Dark Blade Bathory” which just absorb health from your enemy, but then you have moves like “Passion of the Angels”, which removes most of Love Interest’s health but completely heals other party members. This, of course, can be combined with 90% > chance stun moves. To prevent the said character from dying.
Progress Last Week in Numbers:
Lines of Written Code: 235 (but a lot has been modified from the battle system discussed last week.)