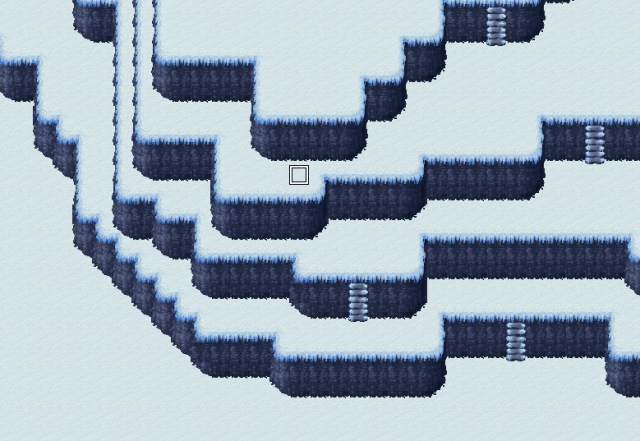
Thank you for tuning in! This week I’m talking a bit about map design and philosophy around Hyperborea. When I am designing the game, I am confronted with a major question: How can I make a environment both bleak and interesting?
This has been the main struggle in the level design of Hyperborea. By the nature of the environment, basically a frozen, barren, wasteland, it eliminates much of the available decor of a normal environment (ex. trees, flowers, human architecture).
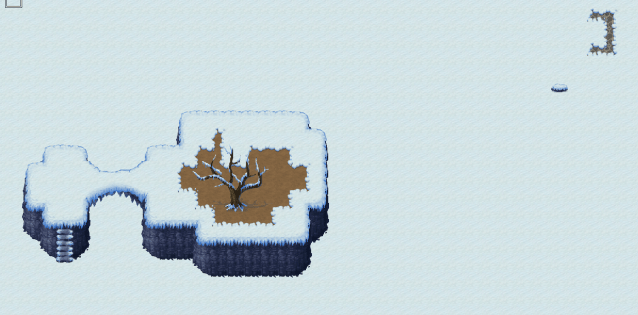
However it does not preclude mountainous environments and canyons, which form some of the main “obstacles” in Hyperborea. When people do see plant life, it will be a special occasion that marks a certain event.
zoomed out image of a tree.
In this regard, the main map of Hyperborea will roughly be a 512×512 grid. Of course interspersed with interior cells.
I have placed some new art from Abiboge, the character artist of Hypatia, the main character. A smaller update since last week was my birthday week, so I didn’t get as much done as I wanted RIP. But what can you do? So some updates on Hyperborea:
The game will be free-to-play. In order to support the game, an art e-book or printed book will be available for purchase on Steam or Amazon.
I’m in the process of developing a random objective location system for Hyperborea so each time you play the game, key items will spawn in different places.
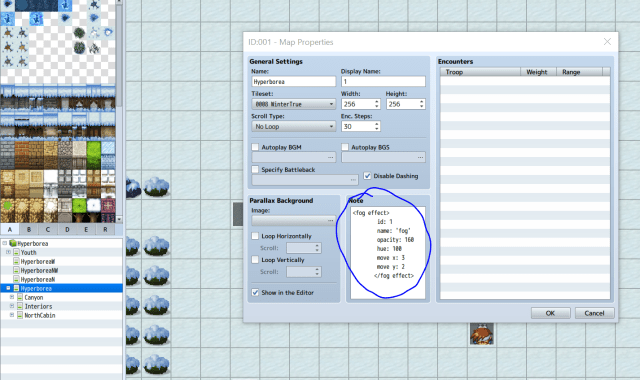
I hope that you are doing well. Today I will go through several ways that I found worked for making fog effects work in RPGMAKER MV. I will use one plugin each and show how they work:
Using Victor’s system was fun, easy and understandable. After installing the plugin and enabling it in RPGMaker MV, you input code into your map notes section. I found that Victor’s example was more than sufficient as a speed and setting.
Now comes the fun part. Tinkering to make sure that your fog actually looks okay.
Finding the Right Fog:
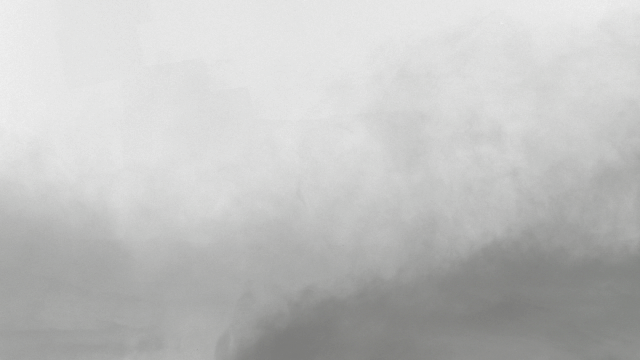
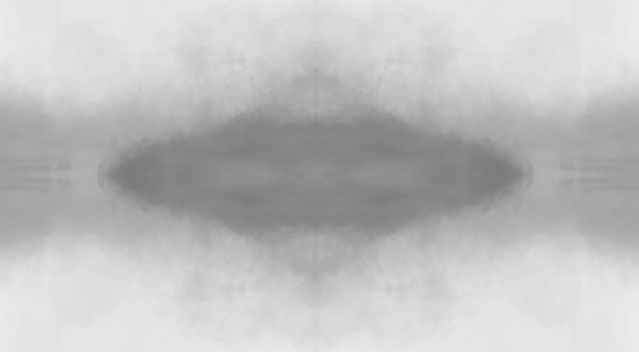
Finding a fog asset or creating one remains one of the most important issues. I used one under the CCL for this example that I found here. Pictured below is the fog that I was quite excited to use.
After placing the file in img/fogs. I turned on the game to find both excitement and disappointment. First, hurrah, it worked. Of course, nothing works smoothly on the first run, does it? As you might guess, I did not take into account the pathway of the panning of the fog. After the panning got to the end of the picture and looped, the discrepancy of color between the edges was highlighted.
A solution to this issue is to make the image symmetrical and identical on the entry and exit points of the picture. Below is an example of what I used in order to ameliorate my woes, basically the original fog image concatenated with the image flipped once horizontally, once vertically, and once both.
Last week I got swamped with my day job, which really limited my ability to work on Hyperborea and Self Insert Draft. But I did get a fog system and a particle system to work using different plugins for RPGMAKERMV. I will produce a writeup for you all tomorrow. In the meantime, please enjoy some backgrounds from a very talented artist Fadjar01 who has been helping me with Hyperborea.
Hello! I hope that you are all doing excellently. This week I have been working on the level design of Hyperborea as well as implementing a simple bullet system in Hyperborea. Part of the fantasy behind Hyperborea is survival and struggle. With that comes some sort of resource management. This led me to have a project with a couple of desires:
Ammunition based combat (Hypatia isn’t going to find too many bullets in the wastes)
Restriction on firing rates (Hypatia uses a breeched loaded rifle)
After some tweaking, I was able to incorporate μ’ki (Riko Sakurauchi)’s system into my game. I will show you the steps of how to do the same in your game!
I used GIMP to create a small bullet what was transparent. Using a spray tool, I initially built the bullet at 32×32 pixels. overlaying gray with black. This proved too big, however, so I scaled it down to 8×8 pixels. After finishing the bullet, save it as a .png and place it in the img\pictures folder in your game.
Initialising the Plugin
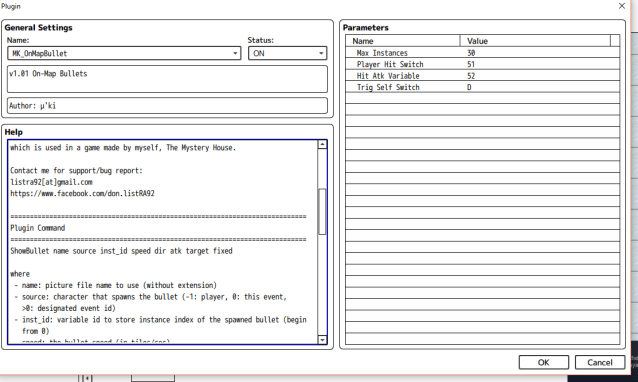
The settings of the plugin interface that I used. The default is fine.
I left the initial settings the same as default after enabling the plugin. The plugin description is perhaps the most important nibble of information that we can glean from here. The ShowBullet plugin command offers a wide array of choices. However, you do not actually need to use all of them. I omitted target and fixed. Hoping for the player to aim themselves.
ShowBullet name source inst_id speed dir atk target fixed

where

- name: picture file name to use (without extension)

- source: character that spawns the bullet (-1: player, 0: this event,

>0: designated event id)

- inst_id: variable id to store instance index of the spawned bullet (begin

from 0)

- speed: the bullet speed (in tiles/sec)

- dir: 1~8: down, left, right, up, SW, SE, NW, NE, 9: towards target,

10: homing

- attack: the bullet's Atk value

- target: character to aim towards (for dir = 9 or 10)

- fixed: whether not to rotate the bullet (can still be changed by

MoveBullet command)
Shooting the Bullet Event
Open a common event in the database (f9) and press plugin command.
My standard shoot became “Plugin Command:ShowBullet bullet -1 100 30 1 20”
-1 = Bullet spawns from character
100 = a random variable number that I have saved to use.
30 = speed in tiles per second
1 = Down Direction
20 = Attack which I did not really implement.
Now we run into our first issue. We want the payer to shoot in the direction that she is facing. This is easily fixed by using a conditional branch and using the character direction as the condition.
Corroborate the if statements with the directional numbers in the plugin description”- dir: 1~8: down (1), left (2), right (3), up (4)…”
  ◆If:Player is facing Down
    ◆Plugin Command:ShowBullet bullet -1 100 30 1 20
    ◆
  :End
  ◆If:Player is facing Left
    ◆Plugin Command:ShowBullet bullet -1 100 30 2 20
    ◆
  :End
  ◆If:Player is facing Right
    ◆Plugin Command:ShowBullet bullet -1 100 30 3 20
    ◆
  :End
  ◆If:Player is facing Up
    ◆Plugin Command:ShowBullet bullet -1 100 30 4 20
    ◆
  :End
Adding Flairs: Ammunition and Reloading Animation
Using the database, I added an item called cartridge. These represent the amount of ammunition that Hypatia has. Installing the ammunition is simple. Go into your common event where you set up your bullet shooting system and add an if statement to the line:
◆If:Party has Cartridge
◆Change Items:Cartridge – 1
Another requirement of mine was to add a different sprite when firing. This was simple. I added a change actor images line (and an angry bubble for flair) BEFORE a forced wait. This gives the illusion of her aiming.
In the end, a simple draft of the code looks like this.
◆If:Party has Cartridge
  ◆Change Items:Cartridge - 1
  ◆Change Actor Images:Hypatia, hypatia(4), $heroine-girl student 6 onepiece(0), sv_heroine-girl student 1 sweat suit
  ◆Show Balloon Icon:Player, Anger
  ◆Wait:85 frames
  ◆If:Player is facing Down
    ◆Plugin Command:ShowBullet bullet -1 100 30 1 20
    ◆
  :End
  ◆If:Player is facing Left
    ◆Plugin Command:ShowBullet bullet -1 100 30 2 20
    ◆
  :End
  ◆If:Player is facing Right
    ◆Plugin Command:ShowBullet bullet -1 100 30 3 20
    ◆
  :End
  ◆If:Player is facing Up
    ◆Plugin Command:ShowBullet bullet -1 100 30 4 20
    ◆
  :End
  ◆Change Actor Images:Hypatia, hypatia(4), $heroine-girl student 1 uniform(0), sv_heroine-girl student 1 sweat suit
  ◆
:Else
  ◆Text:hypatia(1), Window, Bottom
  :Text:no ammo
  ◆
:End
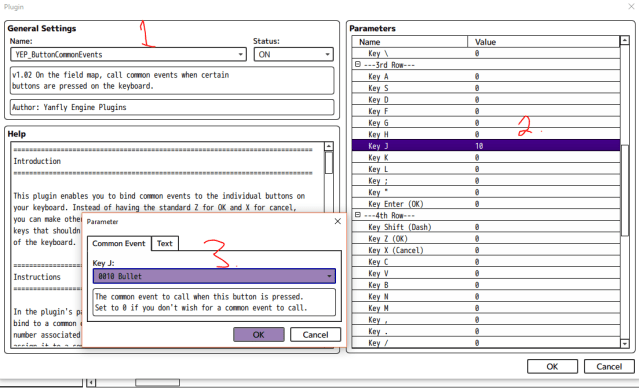
Mapping the Button
This is where Yanfly Button Common Events Plugin comes in handy. Be careful not to mix it up with Keyboard config, because they are not compatible! I learned the hard way.
The process of button events using Yanfly.
Setting up the button is easy. Just link it to your common events. For some random reason I chose the “J” key, but I will probably change it later.
Responsive Events
What fun is a bullet system if nothing reacts to a shot? Luckily in the plugin settings of μ’ki☆Maker‘s [RMMV Plugin] On-Map Bullets, it conveniently allows you to toggle a self-switch on an event. On a walking NPC, add another page where the Self-Switch is D (or whatever you set it to) and set the image to a character’s injured form!
Thank you all so much for reading. I hope that you learned something! More updates to come next week and some more Self Insert Draft things on Wednesday!