Happy New Year! I hope that you all had a great one and have been blessed with a beautiful 2018! Thank you all for your continued interest in Hyperborea. It means a lot to me!
Today I wanted to talk a little bit about what I’ve been doing with map design. Let’s be honest, RPGMaker MV’s standard mapping system, while nice for the basics, can feel a bit limiting sometimes. I really started to realise this when playtesting the game.
I was thinking, how can I improve this honestly, a bit drab looking map (see left). It was draining me when working on the game and making me feel a bit down. But after doing some research, I came across parallax mapping, which really allows you to expand on your maps in RPGMaker MV. I used the following tools to work with adding effective parallax to RPGMaker MV:
With just a little time and effort. I transformed the bland and “auto-shadow” RPGMaker look into something that, at least I think, looks a bit better. I was saying to some of my friends. It is amazing what some shadows can do.
The first step that I took to make this was to use Orange Screenshot saver plugin and save a full resolution screenshot. Because my initial map was 256 x 256, this was my only way to take an accurate screenshot of the whole map.
After that, I opened the file in GIMP. I created a new layer and started adding gravel near mountains. In order to make it appear rocky, I downloaded some free textures (you can find some here) and put them in my GIMP patterns folder (under a new folder I made: Snow). After that I used the clone tool with the “Acrylic 5” brush in GIMP.
After that, I created a new layer called “shade” at 90% opacity. This one was mostly using as a circle brush at 50%.
That sums up most of my GIMP editing, Just working with a lot of mountains, adding gravel and shadow. I will update tomorrow with more information regarding some of the troubles I’ve had with parallax on big maps. It’s a bit late now and I’ll be heading to bed,
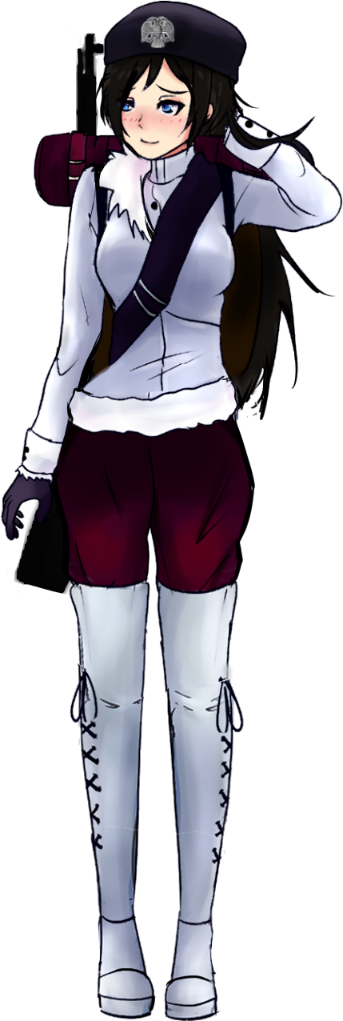
Hello! Thank you for joining me today! This Labour Day weekend, I found myself in Detroit with some family. I did have the opportunity to work on some cutscenes though which will serve as the primary interlocutors of the story for the player! Additionally, I thought I’d introduce a secondary character. Designed by Schlee, I have the honour of presenting Semele, the love interest of Hypatia.
Your actions will determine if she lives or perishes in the harsh environment of Hyperborea! Can you save Hypatia’s “waifu”!
The following week, I expect to have a good amount of the cutscenes finished. Including death scenes, the opening cutscene, and maybe I’ll get some write-ups done for the scene builder tool that I bought for RPGMaker MV. And some commentary: Was it worth it?
Hello! I hope that you are all doing excellently. This week I have been working on the level design of Hyperborea as well as implementing a simple bullet system in Hyperborea. Part of the fantasy behind Hyperborea is survival and struggle. With that comes some sort of resource management. This led me to have a project with a couple of desires:
Ammunition based combat (Hypatia isn’t going to find too many bullets in the wastes)
Restriction on firing rates (Hypatia uses a breeched loaded rifle)
After some tweaking, I was able to incorporate μ’ki (Riko Sakurauchi)’s system into my game. I will show you the steps of how to do the same in your game!
I used GIMP to create a small bullet what was transparent. Using a spray tool, I initially built the bullet at 32×32 pixels. overlaying gray with black. This proved too big, however, so I scaled it down to 8×8 pixels. After finishing the bullet, save it as a .png and place it in the img\pictures folder in your game.
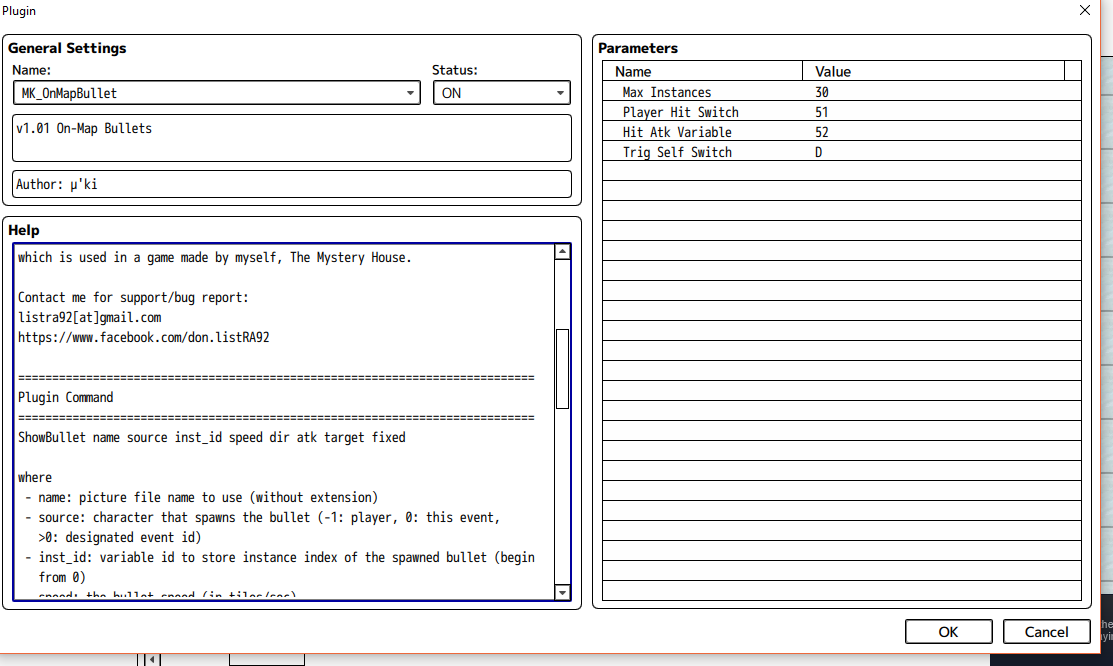
Initialising the Plugin
The settings of the plugin interface that I used. The default is fine.
I left the initial settings the same as default after enabling the plugin. The plugin description is perhaps the most important nibble of information that we can glean from here. The ShowBullet plugin command offers a wide array of choices. However, you do not actually need to use all of them. I omitted target and fixed. Hoping for the player to aim themselves.
ShowBullet name source inst_id speed dir atk target fixed

where

- name: picture file name to use (without extension)

- source: character that spawns the bullet (-1: player, 0: this event,

>0: designated event id)

- inst_id: variable id to store instance index of the spawned bullet (begin

from 0)

- speed: the bullet speed (in tiles/sec)

- dir: 1~8: down, left, right, up, SW, SE, NW, NE, 9: towards target,

10: homing

- attack: the bullet's Atk value

- target: character to aim towards (for dir = 9 or 10)

- fixed: whether not to rotate the bullet (can still be changed by

MoveBullet command)
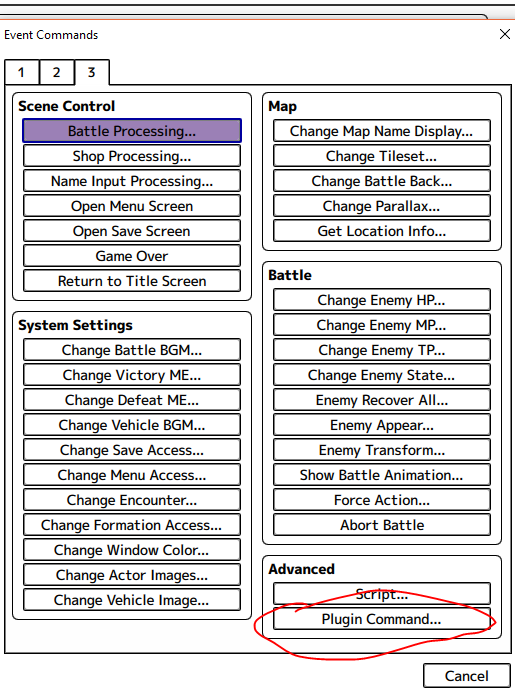
Shooting the Bullet Event
Open a common event in the database (f9) and press plugin command.
My standard shoot became “Plugin Command:ShowBullet bullet -1 100 30 1 20”
-1 = Bullet spawns from character
100 = a random variable number that I have saved to use.
30 = speed in tiles per second
1 = Down Direction
20 = Attack which I did not really implement.
Now we run into our first issue. We want the payer to shoot in the direction that she is facing. This is easily fixed by using a conditional branch and using the character direction as the condition.
Corroborate the if statements with the directional numbers in the plugin description”- dir: 1~8: down (1), left (2), right (3), up (4)…”
  ◆If:Player is facing Down
    ◆Plugin Command:ShowBullet bullet -1 100 30 1 20
    ◆
  :End
  ◆If:Player is facing Left
    ◆Plugin Command:ShowBullet bullet -1 100 30 2 20
    ◆
  :End
  ◆If:Player is facing Right
    ◆Plugin Command:ShowBullet bullet -1 100 30 3 20
    ◆
  :End
  ◆If:Player is facing Up
    ◆Plugin Command:ShowBullet bullet -1 100 30 4 20
    ◆
  :End
Adding Flairs: Ammunition and Reloading Animation
Using the database, I added an item called cartridge. These represent the amount of ammunition that Hypatia has. Installing the ammunition is simple. Go into your common event where you set up your bullet shooting system and add an if statement to the line:
◆If:Party has Cartridge
◆Change Items:Cartridge – 1
Another requirement of mine was to add a different sprite when firing. This was simple. I added a change actor images line (and an angry bubble for flair) BEFORE a forced wait. This gives the illusion of her aiming.
In the end, a simple draft of the code looks like this.
◆If:Party has Cartridge
  ◆Change Items:Cartridge - 1
  ◆Change Actor Images:Hypatia, hypatia(4), $heroine-girl student 6 onepiece(0), sv_heroine-girl student 1 sweat suit
  ◆Show Balloon Icon:Player, Anger
  ◆Wait:85 frames
  ◆If:Player is facing Down
    ◆Plugin Command:ShowBullet bullet -1 100 30 1 20
    ◆
  :End
  ◆If:Player is facing Left
    ◆Plugin Command:ShowBullet bullet -1 100 30 2 20
    ◆
  :End
  ◆If:Player is facing Right
    ◆Plugin Command:ShowBullet bullet -1 100 30 3 20
    ◆
  :End
  ◆If:Player is facing Up
    ◆Plugin Command:ShowBullet bullet -1 100 30 4 20
    ◆
  :End
  ◆Change Actor Images:Hypatia, hypatia(4), $heroine-girl student 1 uniform(0), sv_heroine-girl student 1 sweat suit
  ◆
:Else
  ◆Text:hypatia(1), Window, Bottom
  :Text:no ammo
  ◆
:End
Mapping the Button
This is where Yanfly Button Common Events Plugin comes in handy. Be careful not to mix it up with Keyboard config, because they are not compatible! I learned the hard way.
The process of button events using Yanfly.
Setting up the button is easy. Just link it to your common events. For some random reason I chose the “J” key, but I will probably change it later.
Responsive Events
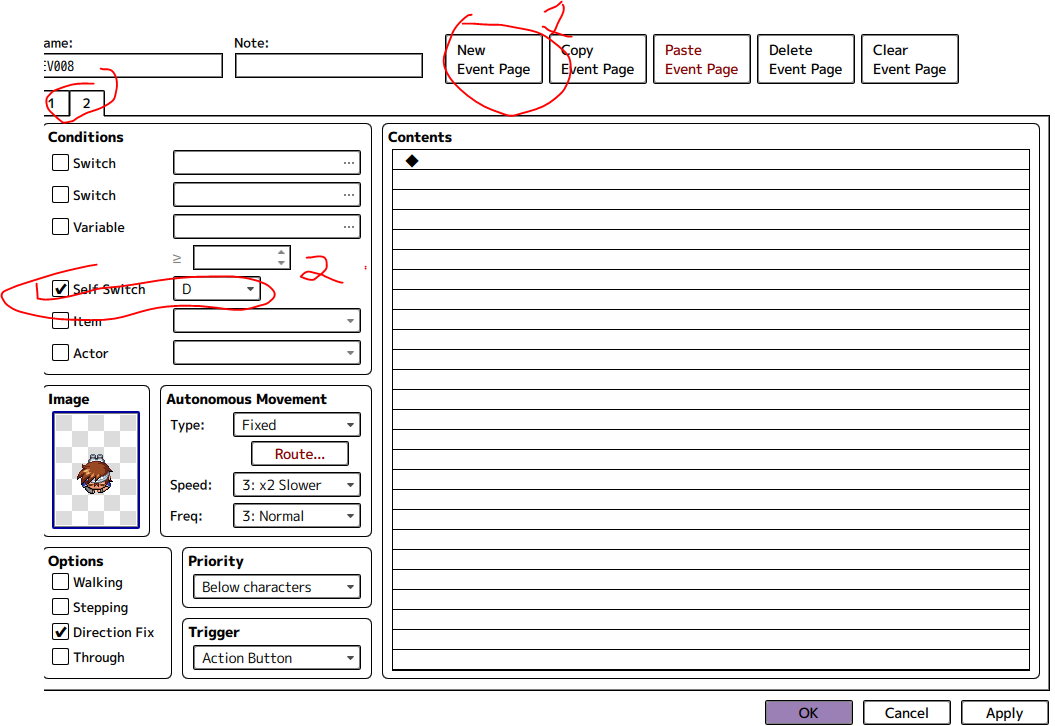
What fun is a bullet system if nothing reacts to a shot? Luckily in the plugin settings of μ’ki☆Maker‘s [RMMV Plugin] On-Map Bullets, it conveniently allows you to toggle a self-switch on an event. On a walking NPC, add another page where the Self-Switch is D (or whatever you set it to) and set the image to a character’s injured form!
Thank you all so much for reading. I hope that you learned something! More updates to come next week and some more Self Insert Draft things on Wednesday!